Summary
This document will help prepare your business in getting your QuickBooks Company file ready to connect with ServiceBox. It will go through some data scenarios and explain things to consider when syncing QuickBooks Desktop with ServiceBox.
Synced Data
ServiceBox will allow your company to do the following with your QuickBooks Company File:
Export Customers (and Job Sites) from QuickBooks - this is usually done during the initial setup. An exported customer will export the following:
Customer Info - Company Name for Companies, and First and Last Name for Individuals
Address information
Phone info
Website info
Email info
etc.
- Export Items during setup from QuickBooks into ServiceBox.
Import New Customers and Job Sites created in ServiceBox into QuickBooks. If a New Customer in ServiceBox matches a Customer in QuickBooks, ServiceBox will attempt to link the two customers.
Update Existing Customers. Once a customer in ServiceBox is linked to a Customer in QuickBooks all updates to the Customer will be synced to QuickBooks from ServiceBox.
Import new invoices from ServiceBox and put them into QuickBooks. This will create a new invoice in QuickBooks related to the Customer and Job Site from ServiceBox. All items and prices are imported as well.
If an invoice that was imported from ServiceBox is marked to Paid in QuickBooks it will mark the invoice Paid in ServiceBox.
If you are using Payments in ServiceBox it will import all payments into QuickBooks.
Import timesheet data in for employees from ServiceBox timesheets into QuickBooks timesheets.
Integration
Once ready to setup the integration with QuickBooks Desktop we will install a Software called the Accounting Connector to the computer that QuickBooks is installed on. We will configure all of the settings and ensure that ServiceBox and QuickBooks can talk to each other.
Export/Import Settings - This tab includes general export and import settings related to connecting ServiceBox to QuickBooks.

There are some settings that we can set in this tab:
Only import ServiceBox customers with invoices to accounting - This setting will only import customers into QuickBooks that have an invoice associated with them. Use this if you want to keep some customers in ServiceBox only.
Append company name to individual name for import from ServiceBox - What this setting will do is if there is a first and last name (ie an individual) and there is a company name, then this will append the company name to the end of the individual name when put into QuickBooks. So if the name is Bob Smith and company is Bob’s Builders, then when put into QuickBooks it will be Bob Smith - Bob’s Builders.
Use ServiceBox invoice numbers in accounting - If you want to use the ServiceBox invoice numbers in QuickBooks then check this off.
Put the ServiceBox Invoice numbers in Invoice Memo - If you want to use the QuickBooks numbers in accounting, but need a reference to the ServiceBox invoice number. Then check this off to add the ServiceBox invoice into the memo field for the invoice in QuickBooks.
Put Customer name on first address line in accounting - If your company has the customer name at the top off the address in the Bill To field in QuickBooks, then you need to check this off.
Attention Prefix - Enter in the attention prefix you would like to use when importing Attention Fields from ServiceBox to QuickBooks. For example, if you have Mike Smith in the Attention field for a customer you can enter in Attn: and when imported to QuickBooks it will display as Attn: Mike Smith in the address line 2 field.
Export from Accounting - You will use this tab when setting up ServiceBox and importing Data from QuickBooks.

You have two options on this screen:
Customers - Use this button to open up the import customers dialogue.
Select All - This will select all checkboxes for customers on the left.
Deselect All - This will deselect all checkbooks for customers on the left.
Export Job Sites - If you check this off all Job Sites for customers will be imported to ServiceBox when the customer is imported.
Create Contact if Company Name is Present - If you have a Company name and also the First Name and Last Name is entered for the company it will create a contact in ServiceBox for the Customer. Be careful though, if this is checked and you have an individual with a company name entered it will treat it the same way.
Attention Prefixes (Comma Delimited) - During data setup it will be important to have address attention fields with an import indicator. So this field allows you to enter the prefix you have chosen. For example, if you have a company that has a primary contact of Mike Jones, when getting data ready for import you would enter Attn: prior to the name in QuickBooks. Before doing the Import input in Attn: to this field and all attention names will be imported into ServiceBox correctly.
Items - use this button to open up the import items dialogue
Select All - This will select all checkboxes for customers on the left.
Deselect All - This will unselect all checkbooks for customers on the left.
Export as Invoice Category - This includes all of the Invoice Categories that are in ServiceBox. Choose the Invoice category that you want to import items to and select the items you want to import and then click "Go". If you have Invoices linked to Quotes, then only use the "Export at Quote Category" dropdown.
Export as Quote Category - This includes all of the Quote Categories that are in ServiceBox. Choose the Quote category that you want to import items to and select the items you want to import and then click "Go".


Getting Started
In order to get the data ready for importing Customer, Job Sites if they exist and Items into ServiceBox, you will need to go into QuickBooks Desktop and ensure the data is clean and ready to be synced. The instructions below go through the various data situations and what to watch out for, and possibly what you should change. We recommend going through and updating the data before we connect ServiceBox to QuickBooks desktop so it will speed up the time required. Some things to consider:
Back up your Company file, just in case.
Block out a bit of time to process the data.
Follow the instructions as best as possible to speed up the installation of ServiceBox.
If you display your customers using Lastname, Firstname, there are some settings described above that you will need to set. Specifically: “Use last name, first name for individual display name”
If you enter in the Customer name into the first line of the Bill To field in QuickBooks, then be sure to check off in Settings: “Put Customer name on first address line in accounting”.
Recommended Settings for Companies
When adding in a Company from QuickBooks to ServiceBox these changes are important to be made in QuickBooks:
Customer Name is the only field that is required. If the Company Name is entered then it should match the Customer Name.
You can enter in other details such as Phone, Email, Website details - All fields are able to be imported.
You can have up to 3 address lines in the Address field. If you have an Attention row, this will go towards the count and so will only be able to have address line 1 and address line 2.
If you enter in the Customer name into the first line of the Bill To field in QuickBooks, then be sure to check off in Settings: “Put Customer name on first address line in accounting” (in Export/Import Settings). The address line one must match the Customer Name.
You can enter in an Attention to into the bill to by appending the name with Attn: If you do not add the Attn: do this, the address line 1 in the import will become the attention name. Also remember to input the Attn: into the field "Attention Prefixes (Comma Delimited)".
Here is a company that is filled out and ready for import:

Recommended Settings for Companies with Contact Names Entered
If you have companies that have a main contact and want to preserve that information in ServiceBox, we recommend creating a contact for the company. What will happen is once the company is imported into ServiceBox a new contact will be created in ServiceBox and linked to the company. To do this, follow the instructions below:
Follow the recommended settings for companies above. This information remains the same in this situation.
In QuickBooks, Include the First and Last name of the primary contact into the Full Name fields of the Customer in QuickBooks.
When you are ready to import this company in the Customer Import window (Accounting Customer Selective Sync) be sure to check off "Create Contact if Company Name Present".
If you want to have the contact name go into the Attention field in ServiceBox add Attn: to the beginning of the name, so in the screenshot below it would be Attn: Han Solo.
Here is a company that is ready for import:

Note: If you choose to import with "Create Contact if Company Name Present" and the settings above, be aware that other customers that have first and last name entered as well as a company name will also be created in ServiceBox with the new customer in ServiceBox as the Company Name and will create a new contact with the first and last name. So if you want to preserve this information be sure to uncheck the "Create Contact if Company Name Present" when importing customers with that info. In this case, do a couple of imports to get the data in.
Companies that Operate Under Different Names
If you want to preserve the Display Name that is found in QuickBooks:
Ensure the Company Name and Address Line 1 Match
If you want to have a display name different than the company name, in the case of a company name that has a numbered company, you can change the display name and set the setting to not alter the display name in QuickBooks (It is on the last tab of the settings screen)
Recommended Settings for Individuals
When adding a Customer that is an Individual from QuickBooks to ServiceBox these changes are important to be made in QuickBooks:
First and Last Name need to be entered and they should match the Customer Name. You can enter a spouse name into the first name as well if required, but all fields must match.
If you display your customers using Lastname, Firstname, there are some settings described above that you will need to set. Specifically: “Use last name, first name for individual display name”. The name that will be used in the Bill To is FirstName Lastname not Lastname, Firstname.
- If you enter in the Customer name into the first line of the Bill To field in QuickBooks, then be sure to check off in Settings: “Put Customer name on first address line in accounting”
Recommended Settings for Job Sites
If your QuickBooks file has job sites added in for customers, then we can import those into ServiceBox as well from QuickBooks. We recommend the following settings:
- Typically Jobs in QuickBooks include the customer info in the details, so all of the details as well as the Invoice / Bill to are related to the customer. The job site will use the Ship to address for the address of the job site. If no Job site address is created we recommend creating the job site.
Job Name can be the Address location or the name of a building. In ServiceBox we can either use the Building name or the address as the name of the Job Site. If the Job Name is the same as the address then it will be added in using the address, if it is different then the job name will be populated into the Building Name.

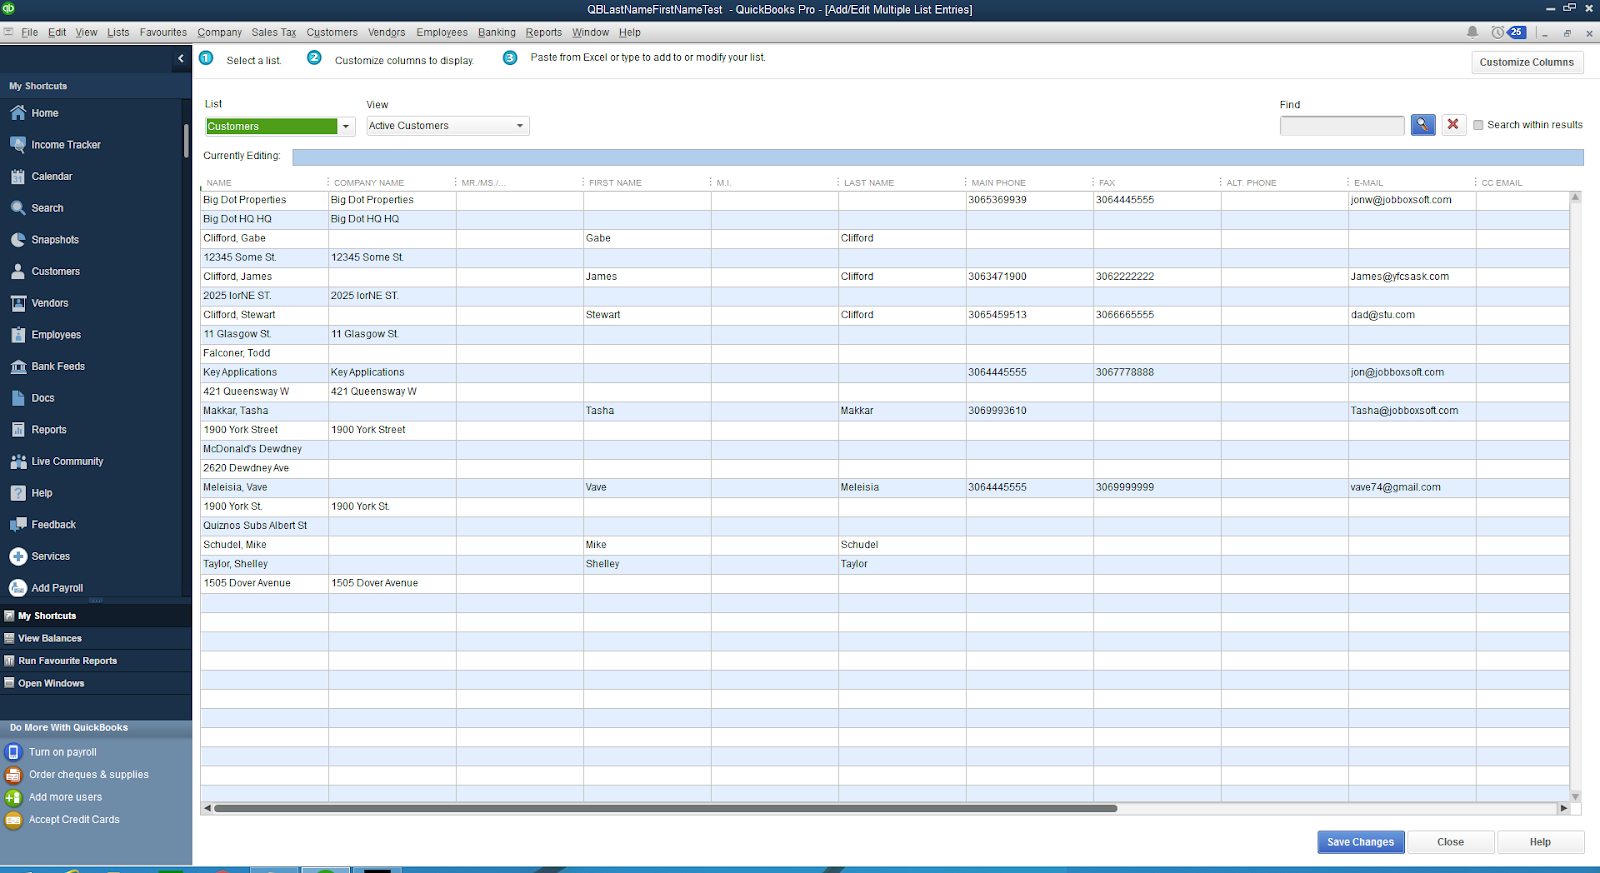
QuickBooks Mass Editing of Customers
If you are in a place where you want to quickly edit the Customers in QuickBooks you can do the following:
Go to Lists -> Add/Edit Multiple List Entries
You will get a view that will allow you to edit the Customers quickly.